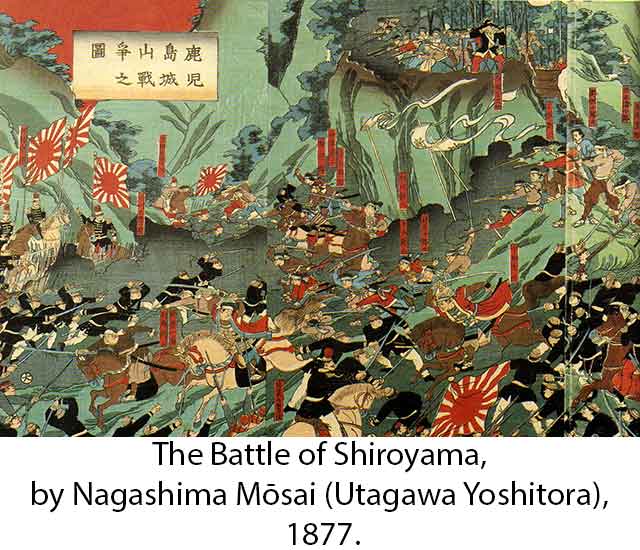
The Battle of Shiroyama, a historic event that unfolded on 24th September 1877, holds significant importance in the annals of Japanese history. It marked the culmination of the Satsuma Rebellion, a conflict that pitted Saigō Takamori's outnumbered samurai against the formidable Imperial Japanese Army troops commanded by General Yamagata Aritomo and Admiral Kawamura Sumiyoshi. The battle's outcome resulted in the annihilation of Saigō and his loyalists, signifying the end of the Satsuma Rebellion and consolidating the power of the Imperial Army. This article delves into the details of this crucial battle, shedding light on its impact and consequences.
Prelude to the Battle
Having suffered defeat at the Siege of Kumamoto Castle and in subsequent battles across central Kyūshū, the remnants of Saigō Takamori's samurai forces retreated to Satsuma, eventually seizing control of the strategic hill of Shiroyama overlooking Kagoshima on 1st September 1877. The Imperial army, led by General Yamagata Aritomo and supported by Admiral Kawamura Sumiyoshi's marines, swiftly encircled the rebel stronghold. In the six months that followed the failed Siege of Kumamoto Castle, defections and combat losses dwindled Saigō's army from 20,000 to a mere 500, while the Imperial Army's ranks swelled to 30,000.
The Imperial Army's Strategic Measures
Despite overwhelming numerical superiority, General Yamagata exercised caution, opting to construct an intricate series of fortifications encircling Saigō's forces. To further weaken the rebels' defenses, he requisitioned five warships, which subjected them to relentless bombardment. Yamagata planned a multi-directional assault, determined to prevent any possibility of escape. He issued orders for firing upon any position engaged by the enemy, regardless of potential friendly casualties, thus leaving no room for the samurai to maneuver.
The Final Showdown
On 23rd September, Admiral Kawamura Sumiyoshi demanded an unconditional surrender from the samurai, pledging to spare their lives if they handed over Saigō. The deadline for response was set at 5 pm that day, and in the absence of any communication, Sumiyoshi initiated an attack on the rebel position. The unexpected heavy bombardment took a toll on the samurai, who had not anticipated such intensity. Defending their position with limited support from Snider-Enfield breechloaders and artillery, Saigō and his men faced a critical shortage of ammunition. To sustain their resistance, they resorted to melting metal statues to produce bullets and improvised medical tools to tend to the wounded.
As the night wore on, Yamagata's forces unleashed a final barrage of artillery, paving the way for the attack on Saigō's position. At 4 am, the battle erupted. The samurai, despite facing intense enemy fire, launched a courageous charge upon the Imperial Army's lines, engaging them in close-quarter sword fighting. The lack of traditional training in hand-to-hand combat among the Imperial troops became evident as the once-organized line dissolved into chaos. The samurai's exceptional swordsmanship temporarily held ground, but their outnumbered status eventually forced them to retreat.
Saigō's Tragic End and Aftermath
During the battle, Saigō Takamori sustained severe wounds to his femoral artery and stomach. Carried downhill by Beppu Shinsuke, he sought a place to commit seppuku (ritual suicide). Acting as kaishakunin, Beppu beheaded Saigō and concealed his head to prevent its discovery by the enemy. However, due to the hasty decapitation, traces of Saigō's hair remained, leading to the head's eventual recovery by a coolie. Following Saigō's demise, Beppu assumed command but met his own demise as he charged downhill and fell to enemy gunfire. The remaining samurai, left without ammunition, resorted to drawing their swords and launching a final downhill charge, resulting in their ultimate defeat. With these events, the Satsuma Rebellion concluded.
Consequences and Legacy
The rebellion's aftermath effectively spelled the end of the samurai class, as the Imperial Japanese Army, composed primarily of heimin conscripts, had proven their worth in combat. Furthermore, the defeat exposed the limitations of banzai charges against modern artillery and rifles. In 1889, Saigō Takamori received a posthumous pardon, and statues were erected in Ueno Park, Tokyo, and near the ruins of Kagoshima Castle to honor his memory. Regarded as a tragic hero, Saigō's actions came to represent the embodiment of bushido and Yamato-damashii, earning him a place in the hearts of the Japanese people.
Conclusion
The Battle of Shiroyama stands as a testament to the unwavering determination of Saigō Takamori and his samurai forces. Despite insurmountable odds, they fought valiantly against the Imperial Japanese Army until the bitter end. This historic clash forever altered the course of Japan's history, cementing the dominance of the Imperial Army and ushering in a new era. The memory of Saigō Takamori and his brave warriors continues to resonate, serving as a reminder of the indomitable spirit that prevailed on the battlefield of Shiroyama.
See also
-
The Siege of Hara Castle

The Shimabara Rebellion of 1637–1638, which culminated in the siege of Hara Castle, was the last major uprising of the Edo period and had serious political consequences.
-
Battle of Tennoji

The confrontation between Tokugawa Ieyasu and Toyotomi Hideyori during the “Osaka Winter Campaign” ended with the signing of a peace treaty. On January 22, 1615, the day after the treaty was signed, Ieyasu pretended to disband his army. In reality, this meant that the Shimazu forces withdrew to the nearest port. On the same day, almost the entire Tokugawa army began filling in the outer moat.
-
Siege of Shuri Castle

The Ryukyu Kingdom was established in 1429 on Okinawa, the largest island of the Ryukyu (Nansei) archipelago, as a result of the military unification of three rival kingdoms. In the following years, the state's control spread to all the islands of the archipelago.
-
The Siege of Fushimi Castle

Fushimi can perhaps be considered one of the most “unfortunate” castles of the Sengoku Jidai period. The original castle was built by Toyotomi Hideyoshi in the southeast of Kyoto in 1594 as his residence in the imperial city.
-
The Siege of Otsu Castle

The siege of Otsu Castle was part of the Sekigahara campaign, during which the so-called Eastern Coalition, led by Tokugawa Ieyasu, fought against the Western Coalition, led by Ishida Mitsunari. Otsu Castle was built in 1586 by order of Toyotomi Hideyoshi near the capital Kyoto, on the site of the dismantled Sakamoto Castle. It belonged to the type of “water castles” — mizujō — as one side of it faced Japan's largest lake, Lake Biwa, and it was surrounded by a system of moats filled with lake water, which made the fortress resemble an island.
-
The Siege of Shiroishi Castle

The siege of Shiroishi Castle was part of the Sekigahara campaign and took place several months before the decisive battle of Sekigahara. The daimyo of Aizu Province, Uesugi Kagekatsu, posed a serious threat to Tokugawa Ieyasu's plans to defeat the Western Coalition, and Ieyasu decided to curb his actions with the help of his northern vassals. To this end, he ordered Date Masamune to invade the province of Aizu and capture Shiroishi Castle.
-
The Second Siege of Jinju Castle

During the two Korean campaigns of the 16th century, the Japanese repeatedly had to capture enemy fortresses and defend occupied or constructed fortifications from the combined Korean and Chinese forces. Among all the operations of that time, the second siege of Jinju Castle is considered the most interesting from the point of view of siege warfare.
-
The Siege of Takamatsu Castle

The siege of Takamatsu Castle in Bitchu Province is considered the first mizuzeme, or “water siege,” in Japanese history. Until then, such an original tactic had never been used.